前言
在项目中我们常常需要配置一些基本的属性,比如连接数据库的 URL, Driven, username,password 等,这些配置内容如果放在代码中会变得难以维护, 想象一下,当你的应用配置信息临时需要变更时,你要改动代码然后重新编译打包再部署,如此一来就耗费大量时间,给用户带来不好体验。因此,我们通常将配置信息放在一个配置文件中,一般以 ==.properties== 结尾,因为可以直接通过 Properties 类读取。
在 Spring Boot 中,默认使用一个全局的配置文件 ==application.properties==, 同时也支持 ==application.yml==, 默认放在 ==src/main/resource== 下面, 可以直接将 .properties 改为 .yml, 效果一样。两者区别: properties 的配置是以 key=value 格式存储内容,而 yaml 则是以数据为中心的语言,配置更加清晰。如下面两者配置方式对比:
1
2
3
4
5
6
7
8
|
server.port=8090
server.context-path=/hello
server:
port: 8090
contextPath: /hello
|
日常开发,我个人习惯用 properties 文件来配置,因此下面使用该格式来进行配置。
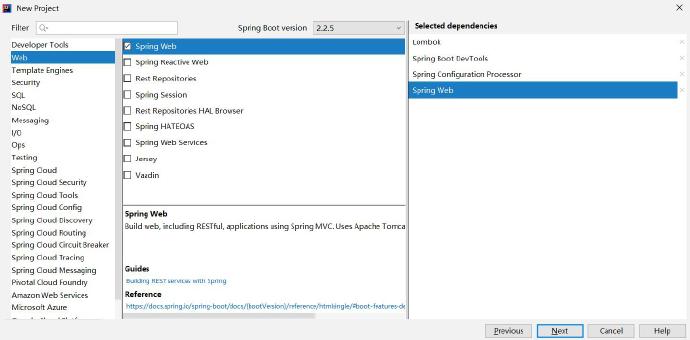
创建项目
![]()
项目结构图如下:
![]()
pom 依赖文件如下:
1
2
3
4
5
6
7
8
9
10
11
12
13
14
15
16
17
18
19
20
21
22
23
24
25
26
27
28
29
30
31
32
33
34
35
36
37
38
39
40
41
42
43
44
45
46
47
48
49
50
51
52
53
54
55
56
57
58
59
60
61
62
63
64
65
66
| <?xml version="1.0" encoding="UTF-8"?>
<project xmlns="http://maven.apache.org/POM/4.0.0" xmlns:xsi="http://www.w3.org/2001/XMLSchema-instance"
xsi:schemaLocation="http://maven.apache.org/POM/4.0.0 https://maven.apache.org/xsd/maven-4.0.0.xsd">
<modelVersion>4.0.0</modelVersion>
<parent>
<groupId>org.springframework.boot</groupId>
<artifactId>spring-boot-starter-parent</artifactId>
<version>2.2.5.RELEASE</version>
<relativePath/>
</parent>
<groupId>top.yekongle</groupId>
<artifactId>springboot-properties-sample</artifactId>
<version>0.0.1-SNAPSHOT</version>
<name>springboot-properties-sample</name>
<description>Properties sample for Spring Boot</description>
<properties>
<java.version>1.8</java.version>
</properties>
<dependencies>
<dependency>
<groupId>org.springframework.boot</groupId>
<artifactId>spring-boot-starter-web</artifactId>
</dependency>
<dependency>
<groupId>org.springframework.boot</groupId>
<artifactId>spring-boot-devtools</artifactId>
<scope>runtime</scope>
<optional>true</optional>
</dependency>
<dependency>
<groupId>org.springframework.boot</groupId>
<artifactId>spring-boot-configuration-processor</artifactId>
<optional>true</optional>
</dependency>
<dependency>
<groupId>org.projectlombok</groupId>
<artifactId>lombok</artifactId>
<optional>true</optional>
</dependency>
<dependency>
<groupId>org.springframework.boot</groupId>
<artifactId>spring-boot-starter-test</artifactId>
<scope>test</scope>
<exclusions>
<exclusion>
<groupId>org.junit.vintage</groupId>
<artifactId>junit-vintage-engine</artifactId>
</exclusion>
</exclusions>
</dependency>
</dependencies>
<build>
<plugins>
<plugin>
<groupId>org.springframework.boot</groupId>
<artifactId>spring-boot-maven-plugin</artifactId>
</plugin>
</plugins>
</build>
</project>
|
代码编写
SpringBoot 项目启动后,会从 src/main/resource/ 下的全局配置 application.properties 或 application.yml 配置文件读取内容并加载到Spring 上下文,有几种方法可以将配置内容注入到属性中:
- 用 @Value 注解注入类属性中。
- 当你的配置内容较多时,用 @Value 需要注入多次,可以通过 @ConfigurationProperties 将 properties 与 Java 类 及其属性相关联。
- 当你有一个自定义的配置文件,如 test.properties, springboot 默认不会加载,这时你可以通过 @PropertySource 引入这个配置文件,配合 @Value 和 @ConfigurationProperties 使用。
application.properties(springboot 默认加载)
1
2
3
4
5
6
7
|
book.author=yekongle
book.name=SpringBoot
song.author=Taylor Swift
song.name=Fearless
|
SongConfig.java
1
2
3
4
5
6
7
8
9
10
11
12
13
14
15
16
17
18
19
| package top.yekongle.properties.config;
import lombok.Data;
import org.springframework.boot.context.properties.ConfigurationProperties;
import org.springframework.stereotype.Component;
@Component
@ConfigurationProperties(prefix = "song")
@Data
public class SongConfig {
private String author;
private String name;
}
|
test.properties(自定义配置文件,通过 @PropertySource 引入)
1
2
3
|
person.name=yekongle
person.age=24
|
PersonConfig.java
1
2
3
4
5
6
7
8
9
10
11
12
13
14
15
16
17
18
19
20
21
| package top.yekongle.properties.config;
import lombok.Data;
import org.springframework.boot.context.properties.ConfigurationProperties;
import org.springframework.context.annotation.PropertySource;
import org.springframework.stereotype.Component;
@Component
@PropertySource(value = "classpath:test.properties")
@ConfigurationProperties(prefix = "person")
@Data
public class PersonConfig {
private String name;
private int age;
}
|
IndexController.java
1
2
3
4
5
6
7
8
9
10
11
12
13
14
15
16
17
18
19
20
21
22
23
24
25
26
27
28
29
30
31
32
33
34
35
36
37
38
39
40
| package top.yekongle.properties.controller;
import org.springframework.beans.factory.annotation.Autowired;
import org.springframework.beans.factory.annotation.Value;
import org.springframework.web.bind.annotation.RequestMapping;
import org.springframework.web.bind.annotation.RestController;
import top.yekongle.properties.config.PersonConfig;
import top.yekongle.properties.config.SongConfig;
@RestController
public class IndexController {
@Value("${book.author}")
private String bookAuthor;
@Value("${book.name}")
private String bookName;
@Autowired
private SongConfig songConfig;
@Autowired
private PersonConfig personConfig;
@RequestMapping("/")
public String index() {
return String.format("book author[%s], book name[%s]", bookAuthor, bookName);
}
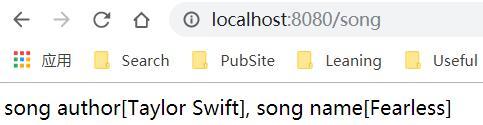
@RequestMapping("/song")
public String song() {
return String.format("song author[%s], song name[%s]", songConfig.getAuthor(), songConfig.getName());
}
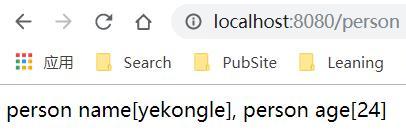
@RequestMapping("/person")
public String person() {
return String.format("person name[%s], person age[%d]", personConfig.getName(), personConfig.getAge());
}
}
|
测试结果
- 访问 http://localhost:8080/
![]()
访问 http://localhost:8080/book
![]()
访问 http://localhost:8080/person
![]()
项目已上传至 Github: https://github.com/yekongle/springboot-code-samples/tree/master/springboot-properties-sample , 希望对小伙伴们有帮助哦。